How to Set up Free web push Notifications in blogger with One Signal (in 2020)

Sending Newsletters by means of E-mails has become old. The eventual fate of the web is more versatile than any time in recent memory and just the brisk connectors to progressively portable benevolent methods for drawing in guests will win and give online distributors a major lift in front of their opposition. Right now, I will give you how you can enable or setup browser pop-ups notifications on your Blogger site and transform your visitors into important clients!
"In This Article, I will show How to Set up Free web push Notifications on blogger with OneSignal"
What is Push Notifications?
Push Notifications-You may have seen when you visit some site (for example Facebook) on your program, a popup demand shows up which requests your authorization to show you the warnings from that site in any event, when you are not effectively utilizing it.
At the point when the client taps on Permit, regardless of whether it's a PC or a cell phone, he/she will have the option to get refreshes from the site about new posts, new recordings or whatever another update that the site might want to send him/her.
Subsequently, the clients hold returning to the webpage and the site acquires expert in the client's psyche. This expands the immediate traffic as well as the social offers and assists with building an incredible trustable and solid network that becomes your loyal visitors.
To see better why Push Notifications are much better and more captivating than customary email bulletins, how about we comprehend their disparities.
Why Are Notifications pop-ups Better Than Email Newsletters?
I am not saying that Email Pamphlets are bad. What I am stating is, they are utilized by everybody and now it has become an old strategy, yet without a doubt is successful.
In any case, there are a lot of favorable circumstances of Notifications pop-ups over Email Newsletters.
Simple To Sign Up
At the point when a guest goes to another site, more often than not he/she won't be open to putting his/her email address to an arbitrary site. Looking from the guest's perspective, he/she will believe that the site may release their email address to outsiders for cash or may utilize it to send spam.
Aside from that, pursuing Email Bulletins can be in fact trying for certain individuals as well, as it requires the client to affirm the sign up by tapping on the actuation interface that they get by means of email. Presently, the enactment mail more often than not winds up in the spam box and in this manner are never found by the client, forestalling him/her from buying into your site.
Regardless of whether the guest pursues your pamphlet, you can't be certain if the clients will really get your messages or not. This is on the grounds that, most well-known email suppliers (like Gmail, Standpoint, Hurray, and so forth.) will in general channel Bulletins as SPAM and hence, the client doesn't see your messages and end up totally overlooking your site.
Look at: How To Keep Your Bulletins From Going In Spam. However, with Message pop-ups…
The procedure is a whole lot easier. The client should simply, click on the Permit button when the spring up shows up and that is it. The client is in a flash bought into your blog with one tap!
That is the effortlessness of Message pop-ups! Higher Navigate Rates (CTR) And Better Perceivability. Be straightforward. How often do you open your email inbox in a day?
A normal client just checks his/her email once per day or even not as much as that. Presently state how often do you pull down the warning board on your telephone?
A great deal of times, isn't that so?
So it must be presently obvious to you that your endorsers are substantially more liable to see the Message pop-ups contrasted with the Email Pamphlets. Furthermore, with an alluring Title and Highlighted Picture, you can undoubtedly draw near to 100% CTR without any problem.
Presently I will tell you the best way to make Pop-up messages in Blogger for nothing, to inform your supporters each time you transfer another post or need to send any update/send an included article notice to your clients whenever you need.
How To Setup Free web Push Notification In Blogger?
There are a ton of administrations out there online which give Push Notification Service to Blogger. In any case, not every one of them is similarly dependable or great.
After a great deal of research, I have discovered that OneSignal is the best free Push Notifications Service for Blogger.
In this manner, I have given a definite guide on the best way to make web pop-up messages in Blogger utilizing it.
First of all Join on OneSignal
Go to https://onesignal.com/webpush and join using the "Get Your Free Account" button.
Type your E-mail Address, Password and the name of your Website.

On the other hand, you can likewise utilize the social sign-in alternatives which supporting sign in through Google, GitHub, and Facebook.
In the event that you joined utilizing your email id, you will get an email from OneSignal (check your Spam confine if not discovered essential inbox) and you have to tap on the "Snap Here To Confirm Your Account" button in the email.
See Above in Image.
After Sign up OneSignal, OneSignal Send a link to Activate Your Account. E-mail to verify Then continue to Add up your website. See the Below image.

Add up your website
Presently you will be signed in to your OneSignal account.
In the wake of shutting the welcome message, click on the "NEW Application/Site" button.
Enter your Website’s name and click on CREATE

Select platform
In the wake of shutting the welcome message, click on the "NEW Application/Site" button.
Enter your Website’s name and click on CREATE
Select platform
You will currently be approached to choose the platform.
Look down (whenever required) and select "Web Push".
Click on "Next".

Configure The Push Notification Service


In step 2, select “Blogger” as your CMS.
Fill out the Blogger Site Setup Form with your site’s name, URL and Icon (logo).
In the Choose A Label field, type your website’s name.
The Auto Resubscribe should be ON only if https is turned ON in your Blogger settings.
Set up Permission Prompt

Scroll down to Step 3, where you can customize how the prompt would like while asking your visitors to allow the notifications. Click On “ADD A PROMPT”.
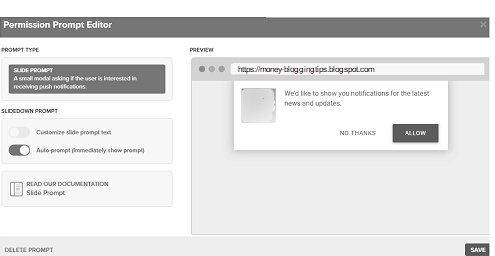
The default settings are sufficient.
Be that as it may, on the off chance that you despite everything need to alter the writings of the slider brief appeared at the right-hand side, empower the "Redo Slide Prompt Text" choice and afterward you will have the option to change the writings into increasingly innovative ones.
At that point click on Save. Make A Notification Bell Icon (OPTIONAL)
In the event that you need, you can likewise make a chime notice symbol which will remain at the side of the screen when a guest visits your website and will let him/her buy into your blog's message pop-up by tapping on it. To make a chime symbol, click on "Include A PROMPT" once more. This time, the "SUBSCRIPTION BELL" alternative will be chosen as a matter of course.
You can change the shading, size, and position of the chime by looking down.
At that point click on "Spare" Customize Welcome Notification (OPTIONAL)
In stage four, you can tweak the warning that a client will get in a split second subsequent to buying into your blog. You may likewise turn off the welcome notification.
Also, Read more- How to make a website on blogger

Save the Changes and copy the code

You need not configure any settings other than those shown above. Now click on “SAVE” at the end of the page.

Click on “COPY Code”.
Add The Code To Blogger Go To Blogger –> Theme–> Edit HTML ( By Using the 3 dot menu in the latest UI.)
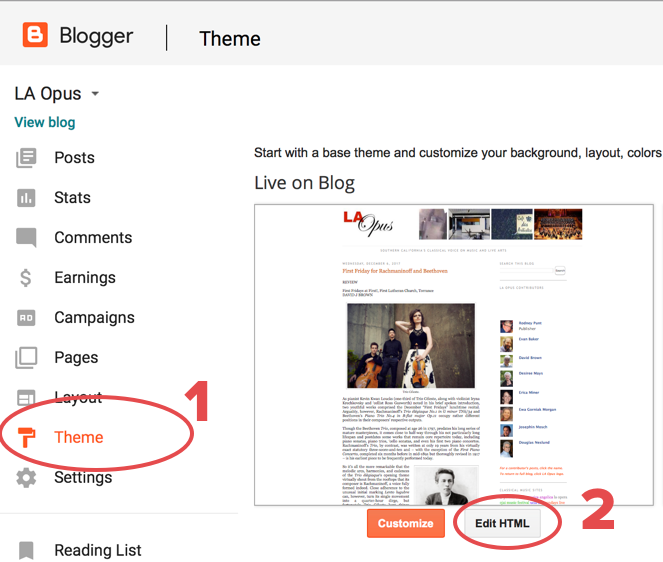
In the edit HTML section, press CTRL+F and search for </head>
Just above </head>, paste the code that you just copied from OneSignal website.

Presently click on the spare symbol. (Situated at the base right corner). At that point, return to OneSignal and tap on "FINISH".
Congrats!!!!
You've effectively made Push Notification Service for your Blogger blog.
How To Send Notifications To Your Subscribers?
Go to app.onesignal.com and choose your site. At that point from the header menu, select "MESSAGES". After the page opens, click on "NEW PUSH".
Top off the Title, Message and Launch URL (the URL which will open when the client taps on the warning). At that point click on CONFIRM.
The warning will be conveyed to all the clients that have bought into your Push Notifications.
If you Like This Article Share with your friends to help them. Happy to Help


)
0 Comments